Migrate multiple repositories from GitHub.com to GitHub Enterprise
Scenario:
https://github.com/MyOrg/MyRepo :arrow_right: https://ghe.example.com/MyOrg/MyRepo
https://github.com/MyOrg/MyOtherRepo :arrow_right: https://ghe.example.com/MyOrg/MyOtherRepo
Preparation & setup
Make a backup of your instance using
backup-utilsMaking a backup of the instance will allow you to easily roll back to a pre-migration state during trial runs.
Set up a sandboxed instance for trial runs
If you're planning to migrate repos onto a production GitHub Enterprise instance, you should set up a sandboxed duplicate of your instance in which to test your migration.
This may not be necessary on a fresh GitHub Enterprise installation
SSH into your GitHub Enterprise instance
ssh -p 122 admin@github.example.comEnsure you have ownership permissions for the Organization you're migrating
For the current version of organizations, you must be a part of the "Owners" team. For the newer version of organizations (currently in private beta at the time of this writing), you must be a direct owner of the organization.
Note: For simplicity, complete the following steps by executing the commands while SSHed into your GitHub Enterprise instance. This will prevent the need for additional file transfers later.
Set environment variables
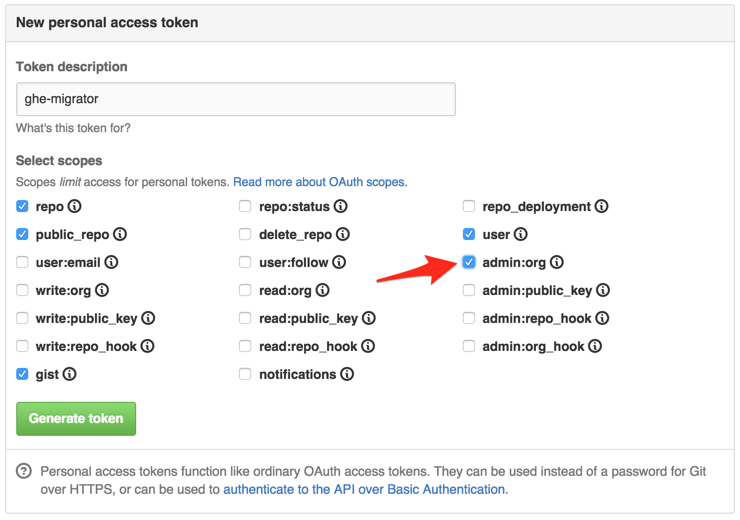
Before getting started, you set the environment variables for your personal access token you set up earlier. Example snippets provided here assume that this variable is set.
Perform a trial run
Note: It is strongly recommended that you perform a backup between as many steps as possible using backup-utils. This will consistently provide recent restore points in the event of an import error.
Perform the migration
Start the migration for the repositories (trial run)
For the trial run, we don't want to unnecessarily lock the repositories. Though commits may occur after the archive is made, it doesn't matter since it's assumed you'll be restoring the archive to a sandboxed instance of GitHub Enterprise anyway, then later discarding the archive.
Command:
Be sure to replace instances of MyOrg, MyRepo, and MyOtherRepo with your appropriate information. Also, be sure to retain the guid and url values from the JSON response. You'll need them later.
You can also optionally store the guid value into an environment variable, which is what is assumed for the rest of this guide.
Monitor the status of the migration export (trial run)
Once you start the migration, it can take several minutes to complete, depending on the combined size of the repositories. This snippet will check on the status of the migration every 30 seconds. Once the state is exported, use ^C to cancel the runner. Replace the URL with the URL you attained in the previous step.
Download the migration archive (trial run)
Once the export is complete, a copy of the archive is uploaded to a file server. However, the archive does not have a publicly accessible URL at this point. This snippet instructs the file server to delegate a public URL to the file. For security reasons, the URL will expire within 60 seconds. To save you from feeling rushed, this snippet also downloads the file the instant the URL becomes available. Again, be sure to replace the organization name and migration number in the example URL.
The archive will be saved to your current directory with the filename migration_archive.tar.gz.
Delete the migration archive from remote server (trial run)
After downloading the archive, you'll want to delete it from the file server. Even though the URL will not be accessible and archives are automatically deleted after 7 days, it's good practice to remove the file from the file server immediately.
Prepare import from archive (trial run)
The preparation step opens the archive, reads it, and loads resource URLs data into the database so they can be mapped in the next step. If you did not set a $MIGRATION_GUID environment variable above, be sure to replace it with the retained guid value from earlier.
Map records and resolve conflicts (trial run)
Detect import conflicts
When importing your backup archive, it's possible that users, repositories, organizations, or other entities will have conflicting names. gh-migrator comes with a utility to detect and output these conflicts to a CSV file.
This will output the conflicts into conflicts.csv, which may look like this:
Keys:
Name
Meaning
model_name
The type of resource that has a name conflict
source_url
The defining URL of the resource as it exists on the source server (GitHub.com)
target_url
The defining URL of the resource as it exists on the target server (GitHub Enterprise)
recommended_action
How the conflict should be resolved. Defaults to a suggested action.
Recommended actions:
Name
Meaning
map
Any references to the source resource should now reference the target resource
rename
Import the source resource with the name provided by the target resource and update references
merge
Combine data from the source resource with the target resource and update references
Resolving conflicts
In conflicts.csv, you can change the target_url and recommended_action for each resource, using the actions defined above. For example, even if the recommended action might be to merge two copies of a team, you may wish to rename the team as it exists on your instance of GitHub Enterprise. You can open the CSV file in a text editor or spreadsheet application to make changes, just be sure to save as a CSV when you are done editing the file.
So this line:
becomes:
Process conflict resolutions and map resources
Once you are satisfied with how you've determined to resolve the resource conflicts, simply use the map command to send your changes back to ghe-migrator. If you are satisfied with the recommended actions that were generated, this command will apply those actions.
Import repositories (trial run)
Once your conflict resolutions have been submitted, you can now perform the import of the archive. You will be prompted to authenticate with an administrator's credentials for the target appliance. You may provide either the password or a personal access token for the administrative user. It's also option to pass these as option flags: -u USERNAME or -p PASSWORD.
Note: This command can run very long, depending on archive size. When running this during your trial run, you may prefix the command with
time. This will give you an idea of how long the import will take on production and about how long you can expect to have downtime.
Audit imported records (trial run)
Once the import is complete, you should validate the integrity of the imported data by performing an audit. To generate an audit file, use the following command:
This will output a manifest of migrated records to a CSV file.
You can specify states using the -s flag (the flag accepts a comma-separated list of states). States you can specify for auditing are:
importmaprenamemergeimportedmappedrenamedmergedfailed_importfailed_mapfailed_renamefailed_merge
For example, to output a list of records that failed to import:
If no state is specified, ghe-migrator audit defaults to the imported state.
You can also specify models to audit using the -m flag (the flag accepts a comma-separated list of models). For example, to audit only pull requests:
When performing an audit, we recommend opening two side-by-side web browser windows, then selecting a line in the generated audit CSV file, open the source (GitHub.com) and target (GitHub Enterprise) URLs for comparison. Check to make sure that data looks consistent. Repeat this process until you are satisfied with the integrity of the migrated records. Audit various types of records, including users, teams, issues, and pull requests.
Once you are satisfied with the trial-run migration results, continue with a production migration.
Start the migration for the repositories (production)
When archiving for the purposes of restoring to production, you need to lock the source repositories. This prevents future commits, issues, or any other changes from occurring. This way, users are forced to only push changes to the new, migrated repositories once they become available.
Command:
Be sure to replace instances of MyOrg, MyRepo, and MyOtherRepo with your appropriate information. Also, be sure to retain the guid and url values from the JSON response. You'll need them later.
You can also optionally store the guid value into an environment variable, which is what is assumed for the rest of this guide.
Monitor the status of the migration export (production)
Same step as what was used in the trial run
Download the migration archive (production)
Same step as what was used in the trial run
Delete the migration archive from remote server (production)
Same step as what was used in the trial run
Prepare import from archive (production)
Same step as what was used in the trial run
Map records and resolve conflicts (production)
Same step as what was used in the trial run
You may use the same file that was generated during your trial run.
Import repositories (production)
Same step as what was used in the trial run
Audit imported records (production)
Same step as what was used in the trial run
Complete the migration
Once you are satisfied that the migration has completed successfully, you need to unlock the repo on the GitHub Enterprise instance to allow users to access it.
Unlock the imported repositories from the command line
You can unlock the imported repositories from the command line. While SSHed into your GitHub Enterprise appliance:
Command:
Unlock the imported repositories from the web
Access your GitHub Enterprise instance with a web browser.
Go to Admin Tools (stafftools) for each repository being migrated.

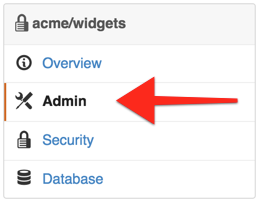
Click on Admin in the left sidebar.

Click Unlock in the Single Repository Lock area.

Cleaning up
Wait a week or two and then delete the (still locked) migrated repositories from GitHub.com.
Last updated
